Tuesday, July 23, 2013

Coming soon - New workshop!


Coming soon!  New Workshop in my Art Studio, Jerrabomberra.  I will post dates for this new workshop shortly.
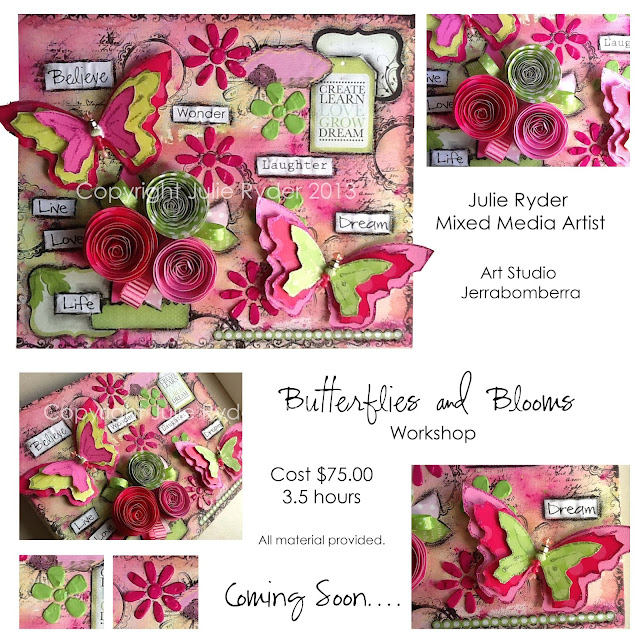
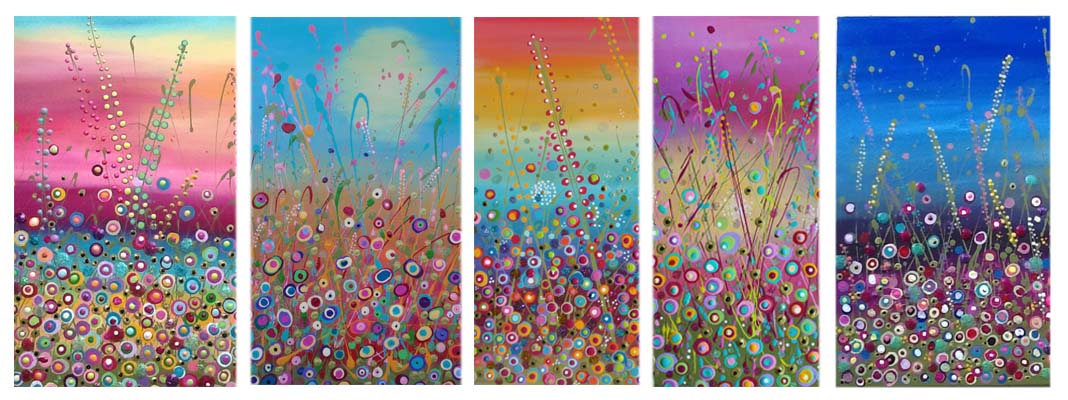
Sunday, July 21, 2013

Sunset Meadow...New!

I will be painting a few of my signature paintings from the 'Flower Meadow' series for the up and coming Queanbeyan Art Trail happening in October this year.  I want to have a large range of works available in the studio so that people will get a good idea of the type of work that I do.  I love working in colour, but I have to remember, that not everybody is also into it, and wanting it on their own walls!! So I think amongst the bright and vibrant stuff, I probably need to do some more neutral or monotone stuff.  Will see how I go!

46 x 61cm Acrylic and glitter glue on canvas.

Above in this picture you can see some of the sparkly bits!

Blue Meadow...New!

These are some of my favourite colour combinations! 
 Its fresh and so very summery!  It measures 46 x 61cm and it would certainly brighten up any wallspace!  I will be listing it very soon in my Etsy store :)


Its a shame, but you cannot see the true shine and vibrancy of this painting from a photo!

Above in this picture, you can see the shiny and glittery, glitter glue and the metallic paint as well.

Friday, July 19, 2013

Poppy Style - Blooming Art Workshop!

Hi and good evening everyone!  Well Wednesday nights workshop was a success!  The lovely ladies did some beautiful work as you can see from the photo below!  Even though it was a smaller class, it was really nice and relaxing and I was actually able to spend a little more time with everyone helping them out and giving them any advice with their painting!  If you would like to book a workshop, just contact me (even though I may not have any booked in - we can arrange something!).
Cheers Julie :)

"Release"...Butterflies and Flowers...


Spring Meadow - Mixed Media On Canvas...


Buy this one in my Etsy store :)


Saturday, July 13, 2013

Free Mixed Media on canvas Tutorial


Welcome to my FREE tutorial on how to create the Flower and Wire mixed media on canvas.  This is a "no frills" tutorial and hopefully if I get a good reception of it, I will do a more professional photo's/text tutorial of my Flower Meadow series paintings.  You can purchase my artwork here. (My Etsy Store).
Or follow me on Facebook.  
https://www.facebook.com/pages/Made-By-Me-Julie-Ryder-Mixed-Media-Artist/336240246440715


I would love some feedback (Please be KIND to my ego and only post positive comments!!)


Materials
1. Canvas of your choice (12 x 16 inch is what I used)
2. 1 x Medium thick Brush
3. 1 x Fine/thin Brush
4. Impasto or texture paste
5. Acrylic Paints (Olive Green, White, Forrest Green, three different shades of Pink, metallic gold
6. Pink Cotton Fabric Material (For Flowers and different material to match for Dragonfly)
7. Thick Gold Wire (Soft and Bendable wire) 8. Very Fine Gold Wire.
9. Clear Glue (Like Tiger Grip or glue that will stick to the thick wire). Do NOT use PVA Glue.
10. PVA glue (for the making of the fabric flowers only and the dragonfly).
11. Old fine tooth hair comb or similar. 12. Spatula or impasto knife.
13.Wire Cutters. 


Step 1.

Above is some of the materials I used in this canvas painting. Impasto, PVA Glue, fine tooth comb and impasto spatula. I start of with the canvas part first, so it gives it a chance to dry before I get started on the making of the flowers. 


Step Two.
Using the spatula, spread a large amount of impasto paste randomly over the canvas. Don’t worry about being too particular about this step as you are going to wipe most of it off anyway! The impasto I used (Monte Marte takes about 24 hours to dry depending on thickness) it dries clear and can be mixed with paint. I love it and use it a lot in my work! Just give the canvas an even coating. Do not let it dry at this point.


Step Three.
Using the fine tooth comb, gently slide it over the canvas taking off the impasto paste. This technique, when done on over the whole canvas and has dried, gives a nice texture of ridges to the back ground to your painting. You can skip this part if you want, but I think it gives a bit of interest to the canvas. 


Here is a close up of how much you will take off each time you drag it down the canvas. I just then put it back in the impasto jar. Its individual choice how much you take off each time, but I like fine little ridges going horizontally on the canvas. Once you have done the whole canvas, put it aside to dry, preferably for about 24 hours. You can dry it with a heat gun or hairdryer, but depending on how thick your impasto paste is, it could take you a while! 


Step Four.
The making of the flowers! Above is the type of wire I used. It actually is kind of bumpy wire and not straight. I picked it up from a Florist friend of mine, but you could buy something similar from a craft store. It is very thin and fine. 


Step Four continued....
With this wire you are going to make the ‘petals’. Decide how big you would like each petal to be. Mine were about 5cm each. Make a loop (I used a cylinder to make each petal the same, and just wrapped the wire around it) and twist at the end. I made 5 ‘petals’ for each flower plus 6 individual petals. So 16 petals in total. 


Step Five.
Using PVA glue, carefully glue your ‘petals’, on the right side of your pink fabric you have chosen for your flowers. At this stage, I just bent the twisted ‘stem’ of the petal upward. This step is a little tricky and quite fiddly. Leave to dry. 


Step 6.
Once dry, very carefully cut around the outside of your petal, making sure to leave a few millimetres around the wire. Bend the twisted ‘stems’ down flat as shown above. Do this to all 16 ‘petals’, then put them aside. 


Step 7.
The next step is to get your thick, bendy, gold wire (I also got mine from a Florist Shop but you can buy something similar from a craft store). You will need this wire to make the ‘centres’ for your flowers and also to go with the single flowers. I used about 10cm for each one. 


Step 7 continued...
To make the coil, gently bend the wire (depending how ‘soft’ your wire is, you may need to use pointy nose pliers). Keep coiling it around on itself to the desired width. I made mine about 2cm or so wide. You will need to make 8 of these. 


Step 8.
Now for the canvas! Once the impasto has completely dried, simply paint the whole canvas in the Olive Green acrylic paint with your large brush. I have used Kaiser colour brand, but of course any acrylic brand will do. Make sure you paint all the sides as well. 


Step 9.
Now once your Olive Green paint has dried, get your large brush (dry it as much as possible) and a small amount of White paint at a time, gently and sparingly paint on the canvas in the direction that your ridges from the dried impasto is going. You kind of want a ‘wash’ effect on the canvas. If you think you have put too much of the white paint on, simply get a dry rag and wipe it off. This is just a very subtle effect.
You don’t want to have too much white paint over the green paint. 


Step 10.
Once the canvas has fully dried, we now have to move onto working out where on the canvas you would like to place your flowers. I always make sure that I don’t have them placed too evenly on the canvas, so I place them something like the picture above. It needs to look balanced, and so I place them down where I want the large flowers to go, then place the single flowers around them to balance the whole look. At this stage, once you’ve worked out their placements, simply glue it all on!

TIPS:
Large flowers – trim down the twisted ‘stems’ with wire cutters and glue 5 of the petals into a flower shape with the clear strong glue (NOT PVA glue). Only glue down the stem part of the petal and not the whole fabric of the petal. You want to be able to manouvere the petal into shape once it has dried.
Using the same glue, stick the flower ‘centre’ (thick gold coiled wire) into the middle of the flower. Leave to thoroughly dry.

Single flowers – Decide which way you would like for your petal to point (up, down, straight etc) then do the same process as above. (only of course sticking one petal down instead of 5).
Refer to the above picture of how the flowers should form. 


Step 11.
Using your fine/thin brush, paint on the ‘grass’ and flower ‘stems’. Short quick strokes are best for the grass, and I like to use a ‘bendy’ or ‘curvy’ style for the strokes rather than straight strokes. Its personal preference. I also added some longer ‘grass’ strokes up through the flowers to blend them all in otherwise you will end up with a gap from the grass to the flowers. You want it to flow a bit. 


Here is a close up of the ‘grass’ strokes and flower ‘stems’. 


Step 12.
Now using your Forrest Green acrylic paint and your fine/thin brush, paint on more grass and stems. This step is just to add a bit of depth to both the grass and the flower stems but not to dominate. You don’t need to paint on as much with this darker green as you did with the olive green. Notice that I didn’t paint every ‘stem’, just maybe part of it (for a kind of shadow effect). 


Step 13.
This next step I have picked out a couple of other pink colours that coordinated well with the pink of the fabric, and make round ‘flowers’. You can use your brush or you finger for this step.


Step 13 continued....
I then added a much lighter colour pink (It almost looks white in this picture). Don’t forget to put some closer nearer the grass area. 


Step 14.
Using thin/fine brush and the metallic gold paint (this looks lovely when it hits the light), paint circles around the ‘flowers’ you just painted.


Step 15. 
Using your thin/fine brush and the Olive Green paint, make ‘stems’ for the other flowers you have just made. You can at this stage also paint on some Forrest Green paint to add depth. 

Tip: Don’t over do it with the darker Forrest green paint.
I have made my ‘stems’ curvy like the other stems I painted. But again, it is a personal preference. 


Step 16.
The Dragonfly! I have used some scrap fabric to match the other pink material, but you could use the same fabric as the flowers or even scrapbooking paper. I cut two larger wings and then in different fabric, two smaller wings as shown above. Glue down with PVA glue. 


Step 17.
Next using one of the same pink acrylic paint as you have used in the flowers, give your dragonfly a head and body as shown. I then used the metallic gold and outlined the body and gave it antenna’s. 


And there you have it! Finished! Hope you enjoyed this tutorial!


Thursday, July 11, 2013

'Scarlets Masquerade' - New mixed media on canvas!


This is the fourth in the Scarlet series, and possibly the last one unless I am commissioned to do any more!  This is Scarlet off to a masquerade ball!  She is made up of acrylic paint, paper, beads, ink, pastels, impasto and buttons.  The canvas measures 16 x 24 inch.  It will be for sale in my Etsy store soon.


The mask was fun to make but time consuming!


'Eden Angel' - New mixed media on canvas.

I loved making this canvas - 8 x 16 inch mixed media!  It was like playing dressups with my doll when I was a child.  Except I could pick her hair colour/hairstyle/dress/ eye colour etc.  Heaps of fun!  Im loving doing all the different 'faces' in my artwork as well.  I think I might do a series of this one but with different hair colour/hairstyle.  So stay tuned!


In the side view, you can see that the sides of the canvas has been stamped/painted too.


A pretty flower she picked and one for her hair!
Her eyes also have a little bit of glitter, which really doesnt show up in the photo's.